DIY With a (Re)purpose
These days I find myself wanting to turn everything (and I mean everything) I see into a tiny plant container and/or a bud vase to hold flowers from my garden. My hobby of re-purposing anything vintage that looks like it could hold a tiny, adorable succulent has crossed the line into obsession and with the recent trend of entire terrarium stores popping up in PDX, it seems the general population shares my affinity for tiny plant culture.
These projects are so satisfying and here's why:
- The possibilities for plant containers and bud vases are endless. They require little to no handyperson skills and yet I get the satisfaction of knowing I "DIYed it".
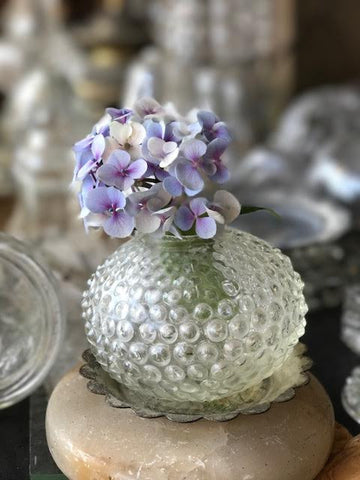
- I can showcase my personality. Example: I. Love. Milk glass. Especially hobnail milk glass. Therefore, any hobnail milk glass item that has an opening on at least one end will get turned into a container for one of my tiny plants.
- I get to actually USE these items now instead of just displaying them.
- They are a perfect, simple, and inexpensive idea for craft night.
- They make great gifts. Everyone loves getting something homemade; it says you went the extra mile and got creative.
I could go on. Truly.
*All the items I'm using are from our vast lighting department
Here's what you will need to create your tiny plant container and/or bud vase:
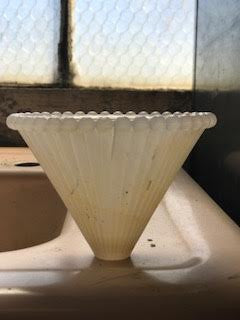
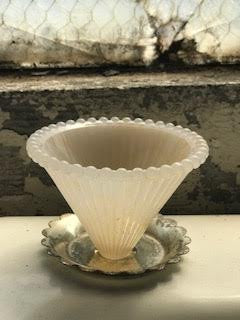
1) A small item with an opening. Like this for a bud vase:
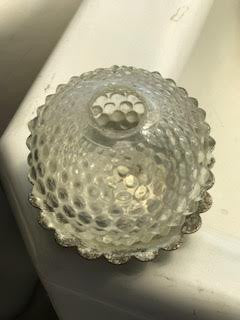
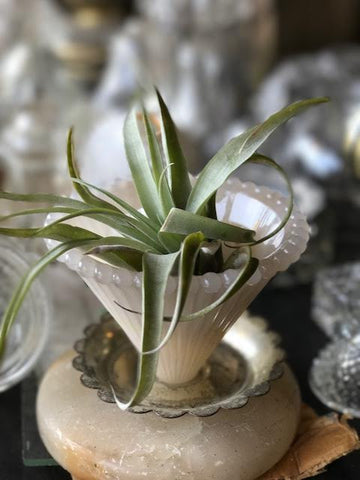
Or this for a succulent/air plant container:
2) A small plate or flatter surface to attach the container part to. This can be optional or necessary depending on if the container part has 2 openings. But it provides a sturdy base and will allow you to use a wider variety of items.
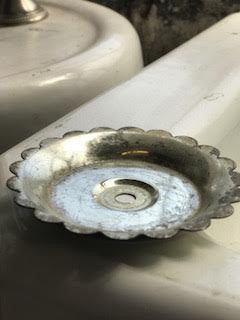
(Note: this particular piece is part of our vintage lighting collection and does have a hole at the bottom. This can easily be covered up with some tape on the bottom and glue to fill the hole in.)
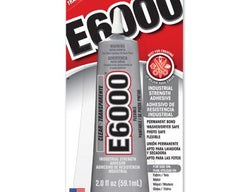
3) Glue--I recommend E6000 craft glue. You can use super glue but the E6000 is better and works on many different materials. You can find it at most craft supply stores.
Directions:
Step 1: Glue the container part to the flat/plate part.
2) Wait for it to dry.
3) Fill it with adorable tiny plants.
That's it.
End results: adorable and one of a kind!
The best part about this project is the shopping for the components. Maybe you have something at home that you've been saving but if not, it's a great excuse to get out to the local salvage store and explore the possibilities. And then you get to go plant shopping too! So get to it. go DIY something adorable and unique. Go re-purpose the heck out of that vintage hobnail milk glass thing you've been eyeing.
Picture Hanging with Victorian Moulding Hooks
Picture Hanging with Moldings
With the explosion of inexpensive artwork during the mid-1900’s, picture hanging styles changed. Starting around the 1870’s, Victorians arranged wall decorations and table settings as “art units.” The dioramas, if you will, consisted of half-a-dozen framed chromos, family portraits, silhouettes, or hanging plates- arranged over a set of standing easels covered in more artwork. The easels were sometimes flanked by a table or a draped étagère, and filled with porcelain figures, tintypes, folding frames and other souvenirs.

No matter how humble the collection, “art units” gave homeowners the opportunity to display their prized items. This was also a convenient technique for compensating for poor lighting, as a group of frames and art objects could be illuminated by fewer light sources.
Hanging pictures in “art units” were typically randomly arranged, with varying patterns of wire. Pictures hung up high were usually tilted downward towards the viewer below, while lower frames were hung flat against the wall.
 A When the wire is attached to the top of
Art units began to dissolve with the introduction of electricity in the home. Suddenly, light was spread more evenly throughout a room, resulting in the individual orientation of artwork on a wall. Directing a light source on an independent piece became much easier. As the novelty of purchasing hundreds of different pictures wore off, homeowners graduated to exhibiting more self-control in the volume of pictures and trinkets displayed.

Through the 20’s picture molding was a stock item for millwork houses. However, with the Colonial Revival in architecture, ceilings lowered and “modern” decoration branded visible picture wires hopelessly Victorian. By the 1930’s, frames were hung on invisible wires and eventually on nails and hidden hangers.

Luckily a large number of original hangers still exist, preserved for your present-day interior design.

Hippo Hardware stocks a collection of original and reproduction picture hangers- available in every metal type and a variety of shapes and sizes to match your aesthetic. We also carry 11 colors of cord (60lb test) to add a professional, finished look to your frames. We are more than happy to assist you in coordinating the perfect combination for your home! 
At "Death's Door": A History of Hemacite
- Hem´a`cite
|
n. |
1. |
A composition made from blood, mixed with mineral or vegetable substances, used for making buttons, door knobs, jewelry etc. |

With the growth of slaughtering and butchering trades in the 19th century, disposing of large quantities of blood became an issue. You literally couldn't give the stuff away! London butchers in Newport Market were banned from tipping blood into the sewers as it would attract rats. Luckily recycling was already a common practice: phosphorous matches were made from ground bones, tobacco ash was re-purposed into tooth-cleaner, and desiccated fish eyes were used for the buds on fake flowers- delightful!
These innovations were a catalyst for creative approaches to blood disposal, as a headline from the January 1892 issue of Manufacturer and Builder magazine suggests:
Door Knobs, etc., from Blood and Sawdust.
Invented by Dr W H Dibble of New Jersey, Hemacite is a material made from sawdust and the blood of slaughtered animals. Primarily from cattle and pig, the blood and sawdust, combined with 40 thousand pounds per square inch of hydraulic pressure and chemical compounds, transformed into surprisingly durable and beautiful everyday items.
This composition was pre-plastic, and ideal for everything from doorknobs to roller skate wheels to products such as buttons, cash register keys and even jewelry. The composition of Hemacite was touted as susceptible to a high polish, impervious to heat, moisture, atmospheric changes, and practically indestructible.
An article “to skate manufacturers and dealers” in the New York Times, on 11 October 1885, stated that “the superiority of our Hemacite Roller over boxwood is now well known.” The success of the campaign spawned other articles like a 21 February 1903 Times ad by the Siegel Cooper department store, promoting 75-cent roller skates with Hemacite wheels, a more expensive option than skates with “plain black wheels.” Strangely enough, these adds were often juxtaposed with plugs for products like Plasmon Cocoa Mix- “A blood-invigorating and muscle-making beverage of the highest order.” Plasmon’s active ingredient was Albumen, the organic binding agent behind Hemacite roller skate wheels. Clever marketing or a dark sense of humor?!
At the time of the Manufacturer and Builder article, Dibble Manufacturing Company had been producing Hemacite architectural details and door knobs for quite some time. Rather than having a separate knob and shaft to wear out, Dibble’s knobs were molded as one unbreakable piece, and came with a guarantee for the lifetime of the door.

Due to its consistency, Hemacite is easy to confuse with Bakelite. Even cheaper to produce, the popularity of plastics like Bakelite almost entirely replaced the production of Hemacite by the early to mid-1900’s. Ever strong and durable, these house fixtures and doorknobs live on today- you can spot several in our nationally registered museum case at Hippo Hardware, and on occasion we will get a few in for sale. Talk about a real “conversation piece” to adorn your home!

How to replace modern doorknobs with antique doorknobs
A commonly asked question here in Hippo land is "How do I put beautiful antique hardware on my modern doors?" To support antique hardware lovers everywhere, we'd like to offer you a step by step guide to replacing your unwanted modern hardware with stunning antiques!
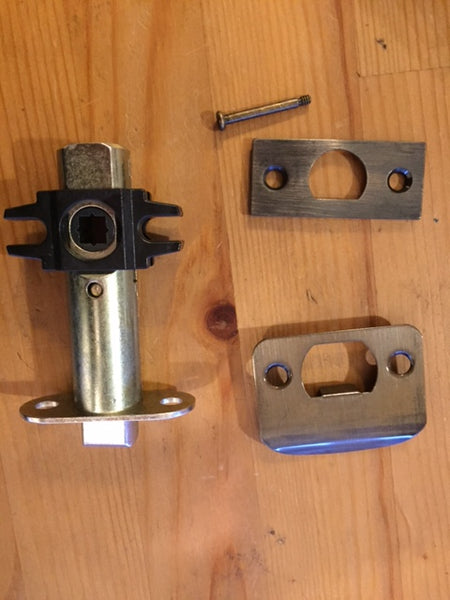
What you'll need:
1) A tube latch with face plate and strike (1)
2) Door plates (2)
3) Doorknobs (2)
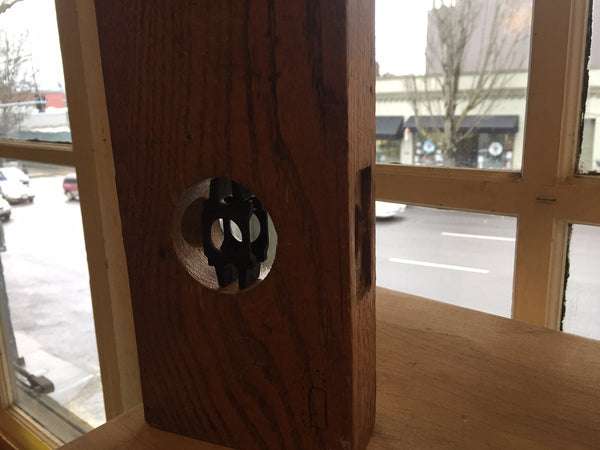
Step 1: Take off all your existing hardware.
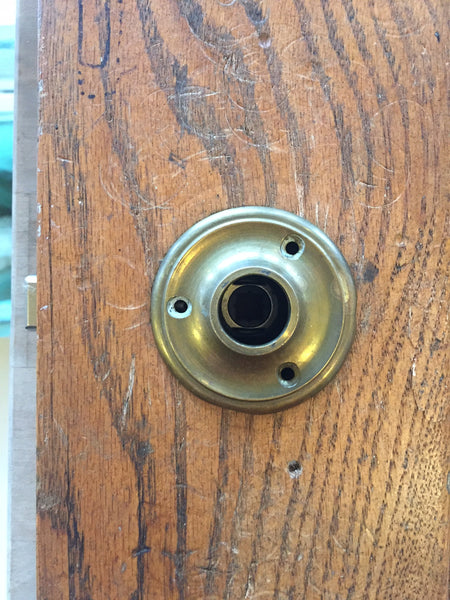
We're assuming at this stage that you have something that looks kinda like this:
How to disassemble is different for most manufacturers. Usually you need to look for some kind of 'pin' or set screw in the shaft of the doorknob to start. Some have an actual screw, some have a thin wire that needs to be pressed down, and some have a small hole that needs to be depressed with a screw driver. Some of them are really not very obvious and you might need to google search some instructions based on your knobs.
At the end, you should have a naked door that looks like this:

(Note - it's more likely the large center hole does not have divet in the back. This will be of no importance either way)
Step 2: Install a Tube Latch
First we start with a reproduction tube latch. A new tube latch will get you all these parts: A tube latch body, a face plate, a plastic spacer, and a strike plate. The pin won't be needed! Antique tube latches are also great and normally have a face plate already integrated.
The bonus of the separate face plate is the plunger can rotate to either side before securing the face plate, allowing the door to swing either way. Some antique tube latches can also rotate the plunger, but usually require opening them up. It's a great thing to explore if you're adventurous- but be careful to not lose parts and take a picture of the guts before you start pulling things out!
First, we take the black spacer and put it into the hole. This part will keep your tube latch aligned in the center of the hole:
 Next, put the tube latch through the hole in the narrow edge of the door and through the space, like this:

Now you can rotate the plunger so the face of the plunger slopes towards the jamb of the door, or to where the strike will be. Think of it like if you threw the door closed behind you, you'd want the latch to hit the strike and slide up it until the door clicked closed. Once you have the plunger facing the correct direction, put the face plate over and screw it down:
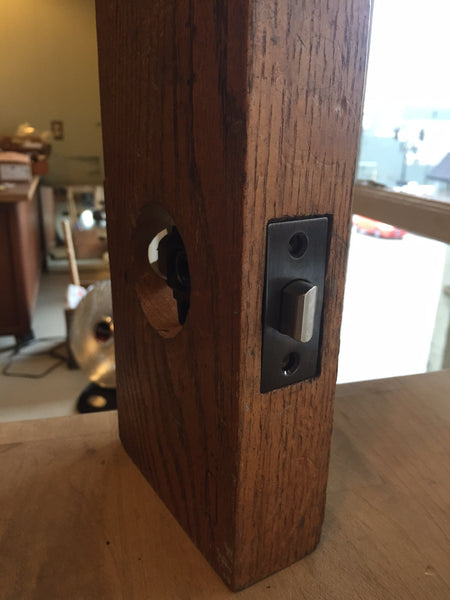
Now is a great time to replace the strike if you need to. Make sure the latch lines up with the hole in the strike. You may already have a perfectly serviceable strike from your previous hardware.
Step 3: Install your plates
Next come the plates. Here is the biggest limitation when you have the large 2 1/8" hole - it's too wide for many antique plates to cover. It could be drastic like this guy:
Or less noticeable but still peaking out like this one:

Rosettes can be some of the trickiest because it looks like a perfect fit... until you realize that the screw holes are over the hole too and there's no easy way to attach it (we really don't recommend glue). There are tricky ways around this if you want to get long machine screws but it's a bit of work.
As long as the plate can attach to the door, the gap is aesthetic. If it doesn't bother you, there's nothing to stop you from using a plate that's too small to cover the hole. Most our customers don't like it and end up looking for a plate that is:
a) wide enough
b) has the screw holes over the wood to attach
A third option are reproduction rosettes that screw together. They're nice because you can get the antique rosette size without having to fill your door:

Yet another option are these reproduction rosettes that are an impressive 3" in diameter, leaving enough space to screw them directly into the wood:

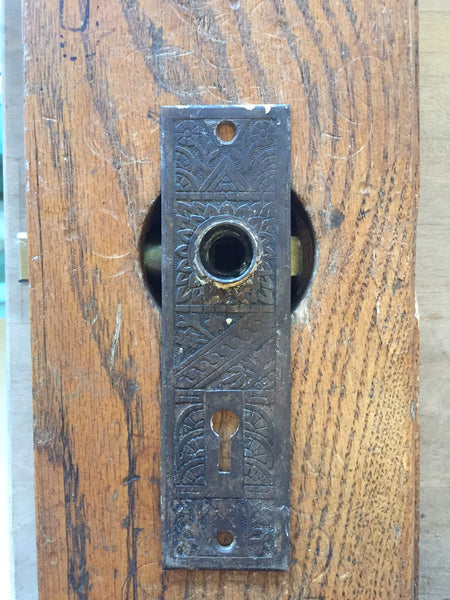
For our example, we will use a lovely original 1915 craftsman door plate. The plate should be lined up with the hole in the plate for the doorknob over the hole in the latch:
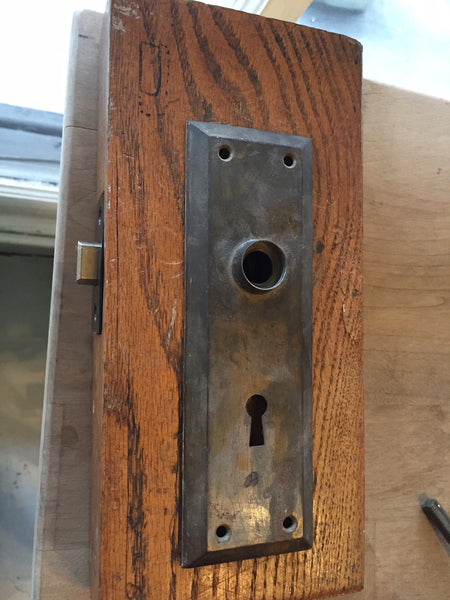
and a detail of the alignment:

We normally wait to screw in the plate until the knobs have been installed. That way you can make sure the knobs are moving completely freely before screwing the plates down. The knobs are frequently snugly nested into the plate so even a slight lift or lower of the plate can cause the knobs to rub.
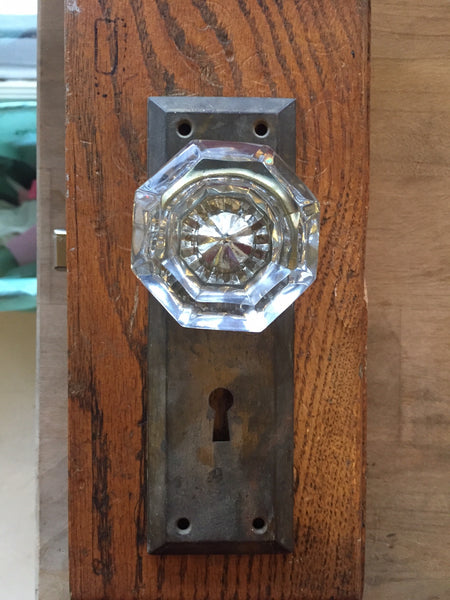
Step 4: Install Doorknobs
Next it's time for the knobs. Really, you can use any antique knobs with a spindle that you'd like. For this example, we're going to use a classic 1920's pair of octagonal glass knobs with a threaded spindle:
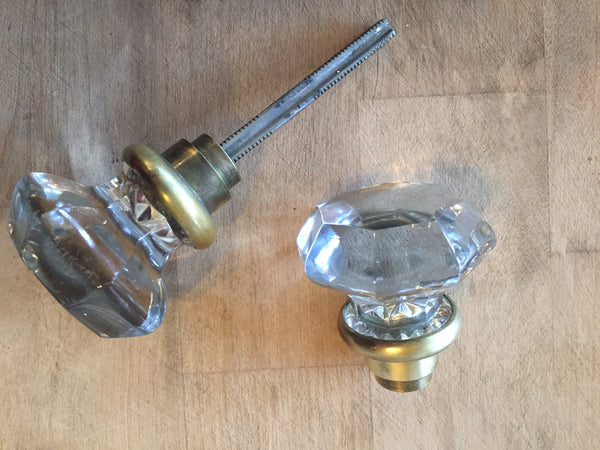
Take off one knob from the spindle which will involved loosening or removing the set screw in the collar and unscrewing it from the spindle. (Note - a straight shaft (non-threaded) knob set will also work but will come apart differently.)
Take the knob with the spindle attached and slide it through the door - both plates and the tube latch.
It's nice for alignment when the knobs nest into the plate bezel, like this:
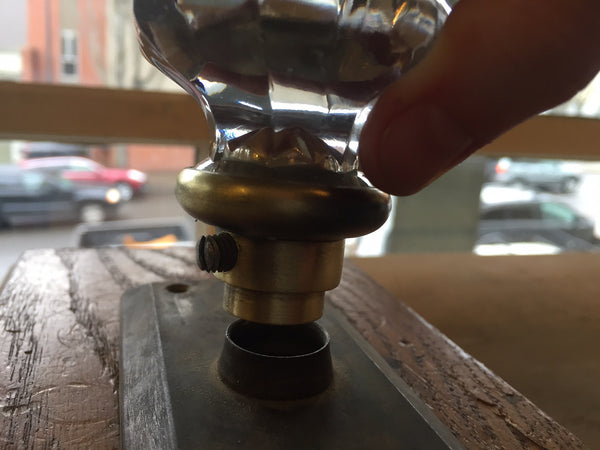

It's not strictly necessary. Your knob can sit on top of the plate bezel but it's how the pieces were intended to function and it keeps the knobs from wobbling.
Once the first knob is through, re-attach the second knob so that it fits snugly but still moves freely. With threaded knobs, you'll have to experiment with the right placement although be sure to avoid putting the set screw down on the corner of the spindle. It will likely give way pretty quickly and your knob will start slipping. For straight shaft knobs, getting spacing right will usually involved getting actual spacers as the knobs are in fixed locations on the spindle.
Step 5: Screw Door Plates in Place
Once everything's in the right spot, make sure the knobs are sitting exactly perpendicular to the door and screw down the plates! All finished and looking good my friend!
Niles Chicago: Sometimes the Good Die Young
Your antique hardware can usually be fixed. In a lot of cases it that is because of the hardware boom of the late 1800’s and early 1900’s which was a flurry of design and innovation that created hardware standards for years to come. Many of the designs used the structure of spindle, set screw, knobs, and mortise that could be interchanged, or, at least, manipulated to work together. Sargent, Yale, Corbin, and Mallory Wheeler are some of the major manufacturers of the time who produced such hardware.But what about the innovation that wasn’t absorbed into the main stream manufacturing? Well, this brings us to the tale of the Niles Chicago hardware.
Milton Cleveland Niles, a farmer with some bright ideas, and his son Sidney, implemented a new lock and doorknob design in 1878. Niles and Son began producing the design in 1979 and became the Gray Iron Company in 1880. The Niles Chicago hardware differs from the more common threaded knob and spindle hardware in one major way; the spindle and knob are integrated.

Each knob is attached to an oversized "integrated" spindle. The spindle has a knuckle on it that, when fit into the mortise and turned, will open the latch. The Niles Chicago mortises themselves are unusual, featuring a larger hole and with a bar separating the two halves for each knob to snap into place.

The knobs move independently of one another, a slick departure from threaded spindle kits.

The major advantage of this design is the impeccable fit. There is no need for set screws or washers, no loose and rattling knobs, no stripped knobs from loose spindles, and perfect fits for the escutcheons. Also, the Niles Chicago knobs can be found in popular patterns, materials, and finishes of the time, such as the Le Grande and Corinthian patterns. Niles Chicago also made glass knobs, very cutting edge for the time!

I would LOVE to eliminate the rattling and twisting of the doorknobs and spindles in my house by using all Niles Chicago hardware, but it’s not quite that simple. Niles Chicago is hard to find because it was produced for only a short while.
The Chicago Hardware Manufacturing Company became the Gray Iron Company in 1882, and after 1888 the Niles Chicago design was seen less and less. The design, while superior in some ways, was also created in the middle of a design boom, and other more standard designs won out in popularity. Also, while there are less parts to replace and adjust on the Niles Chicago design, that also means that when a part fails, there is no easy fix. That aspect shortens the life of the hardware significantly.
It still leads us to wonder, what place would Niles Chicago have in antique hardware today if it was more wide spread? Would our door knobs jingle less? Would the design of more modern hardware have seen different and more advanced designs today? Would we just have 2 minutes more each day to snuggle our cats because we got to spend less time jiggling loose door knobs?
Hard to say. But Niles Chicago hardware, despite it's scarcity, is a great part of antique hardware history. And sometimes the good die young.
Additional Reading about Niles Chicago Hardware:
Hippo Hardware's Lighting Shop: Behind the Scenes
We'd like to take a minute here and highlight our amazing lighting shop. Our shop has daily adventures with all the wacky antique lighting we restore and rewire. It's not uncommon to head back there and hear the grinding wheel, drill press, and and polishing wheel all whirring away.
Not only do we wire our own fixtures, we take in repairs! That can mean everything from someone's favorite chandelier to some really wacky ideas- a blend? a mailslot? a ship's wheel? Sure thing!
Here are some chandeliers in the shop's ante-room. Sort of like a waiting area for light fixtures:
 Here is an overview of the shop:

Here is a chandelier in progress (the shop gentlemen are tender sorts and did not volunteer to be photographed. I was, however, able to convince one to keep his hand in the picture):

And lastly our vice-on-a-post. It's really quite handy:
Need something rewired? Bring it in! Afraid of antique lighting because you want to make sure it's safe, rewired, and able to be hung by an electrician? We've got you covered!
Do you have any stories to share about adventures rewiring light fixtures? Share them in the comments!
Subscribe
Recent Articles
- Have a broken lamp or chandelier? Hippo can help!
- There's been a rumor that we're closing - We're not!
- Removing Valves and Cartridges
- Time Keeps on Ticking
- Hippo Fixes Leaky Faucets
Tags
- antique (2)
- build (1)
- cartridges (1)
- clocks (1)
- faucet (1)
- fix lamps (1)
- greenhouse (1)
- kitchen (1)
- lamp repair (1)
- lighting (1)
- old (1)
- plumbing (1)
- portland (1)
- reuse (1)
- ul certified (1)
- valves (1)
- vintage (3)
- windows (1)
About Us

Hippo Hardware is an eclectic building salvage store specializing in hardware, lighting, architecture and plumbing from 1860-1960. We offer assorted collectibles, trinkets, whatnots, and whoziwhatsits depending on what we get in. The spirit of Hippo Hardware is to rejoice in the individual, the unique, and the original.
Hippo Hardware was officially established in 1976 after the founders Steven Miller and Stephen Oppenheim decided to turn a life of swashbuckling adventures into a second life of swashbuckling adventures. We live in the local, even for our customers far away. That means you will probably hear a story about burying a Porsche in a state park while you are asking about a faucet or meet Fred the shop dog while you're paying for a light fixture. We strongly support community projects, teachers, artists, adventurers, dreamers, and one-man-bands.
If you're looking for a hard to find hardware pattern or can't find the match to your lamp shade, we'd be happy to tell you if we have it, seen it, or know where you could get it.
To make sure you get what you need, we offer the following services:- Lighting and Lamp Repair - We have a fully UL certified lighting repair shop. We can repair and rewire most vintage or antique fixtures. You may want to call or e-mail if it's newer, but we can sometimes fix those too. Shop prices are $80/hour plus parts.
- Customizing - We do our best to make sure it looks just right. Our lighting shop can customize length, finishes, plating, and configuration. Our plumbing department will coordinate refinishing with local companies. The hardware department is able to darken, refinish, clean, and rebuild. Our services can vary depending on staff so please contact us with your project details.
- Returns - Accepted for any reason within 2 weeks of purchase. That means if it doesn't fit, if your sweetheart doesn't like it, if it doesn't match your paint scheme. Receipt required. Returned to you the way you paid and items MUST be in original packaging and condition. Defective or damaged items will not be eligible for a refund.
- If your items were shipped: Shipping refunded only in the case of defective items. Hippo does not refund original OR return shipping cost.
- Online shopping - Conveniently browse our online section of items! Please note: our online section is much smaller than our store selection, we do offer returns for online purchases but do not refund original shipping or provide return shipping. We ship on Wednesdays, Thursdays and Fridays.
- Trade in - Bring in what you have and we will offer you in store credit or cash. Email pictures first if you'd like to talk about it before you get here.
- Mortise lock repair - Hippo is the only hardware store in Portland that offers full mortise lock repair--including French Door mortises and closet mortises! Our repair shop can diagnose and repair your mortise lock or perhaps we have a replacement if a repair is not an option. Shop prices are $80/hour. Please call our store and ask for Colin to speak about your repair!
Hippo Hardware has three glorious floors and 30,000 sq feet of building salvage to explore. Our inventory, and staff, is divided into four departments: Hardware, Lighting, Plumbing, and Architecture. We do our best to highlight our inventory full of unique items and reproductions on our website, but most of our stock is not online yet. Please contact us if you're looking for something you don't see here.
We donate to: NARAL, Planned Parenthood, Portland Women's Crisis Line, Benson High School, Sunnyside Environmental School, Junk to Funk Recycled Fashion Show, SE Works, Vision Northwest, Multnomah Playschool, Union Gospel Mission, Community House, The Friendly House, Marylhurst Childhood Center, Portland Lions Club, Sabin Elementary School, Oya No Kai supporting the Japanese Magnet Program, Lee Owen Stone Preschool, Public Interest Law Project, Jefferson High School for the Performing Arts Theater Department, imago Theater, Reynolds High School, David Douglas High School, and Milagro Theater.


