American Bicycle and Hardware Retrospecive: A Brief Report
Thorson, the 1895 wooden rimmed, skip tooth bicycle hangs over the Plumbing Department in Hippo Hardware, was the first thing I connected to here at Hippo. I have a deep interest in bicycles so this was the first antique that really caught my eye!
One of the ways that I have previously understood history is through the design and manufacturing of bicycles.
So, as I was admiring Thorson one day, I thought it would be interesting to trace the history of bicycles along side the production of hardware. Below I will trace the key historical developments of bicycles along side hardware to give a bigger picture of American industry.

The 1890's
Bicycles:
Picture this: Chicago, 1895. The bicycle had been being produced in America since the 1870's. In 1895 there were over 75 manufactures of bicycles in Chicago's "Prairie District." Most of them closed within the year. A few remained open such as Western Wheel Works, and Arnold Schwinn's bicycle manufacturing, which made bicycles in the U.S. through the 70's.
Our friend from the ceiling's manufacturer, The Thorson Cycling Company, didn't make the cut. However, Thorson dons many of the contemporary trends of the time. Before the modern day bush-roller (roller) chain, was the "Humber" or block chain.

Instead of having a pin that goes through bushings, this chain uses a "block" of metal that rotates around the pin plate. Also the skip tooth 1/4" diameter chain ring was the major trend in chains and gears. Previous to chains, bicycles were driven by rods, belts, or direct drive front wheels.

Like hardware, the bicycle was created in Europe. Most developments were made in England, France, and Italy and eventually imported to the U.S.
Hardware:
1895 was the heart of the Victorian era, more specifically Period Revival and Queen Anne. Ornate stamped brass, bronze and cast iron in famous patterns such as the "Windsor", "Roanoke", and "Ceylon". And many countless other patterns which are lesser known. Pictured below are a set of stamped brass Roanoke Doorknobs.

As with bicycles, certain manufactures marked the ages and carried production well into the 20th century. Sargent, one of the biggest producers of Victorian hardware, made strong beautiful latches, pulls, door knobs and other items. Other companies gaining momentum at this time were Corbin, Yale, Chicago, and Standard Plumbing.


1930's (a bit of a fast forward)
Bicycles:
Almost all bicycles sold in the U.S. in this era were made in the U.S. The Humber chain was still used, mostly by track racers, and the roller chain was now most common on bicycles produced for leisure riding. At this time in the U.S. cars outsold bicycles 10 to 1, so most bicycles were ridden by teenagers who could not yet drive. However, in Europe, bicycle manufacturing and component design was booming.

The Schwinn & Company, determined that the American public would go wild about bicycles with the right approach, created "light weight" models equipped with multiple gears! Predating the modern day derailleur was the internally geared hub. These hubs had 2 speeds and a coaster, or back pedal, brake. The New Departure was the the first widely sold multi-speed hub, and an important stepping stone to the modern day derailleur, which, today, goes up to 11 speeds on the rear wheel!

Still a skip tooth!
(Note: The first derailleurs were actually designed in France in the 1890's.)
Hardware:
This is the begin of the "Modern" era. Art Deco for everyone! Hardware began changing, mostly around door hardware and latch and spring designs. The old mortise style latch was overshadowed by the new "tube latch."


The depression had left it's mark. Mortise locks, with intricate internal springs and latches, and mostly brass plates, were left behind for cheaper plated steel tube latches that used a lot less materials to produce. The Schlage company revolutionized door hardware by drilling out doors to fit tube latches instead of mortises. Dexter, Skillman, and Norwalk were the companies whose names were sought after in the 30's and 40's.
While bicycle sales were dwindling, having ebbed by 1905, hardware was still needed, used, and aesthetically relevant. The ringed or circle patterns are a hallmark of the Deco era and seen on these Deco Doorknobs shown below are still considered classic celebrated today!

1950's
Bicycles:
Bicycles were still slow selling in the U.S. market, there was a small increase in bicycle sales after soldiers returned from war, and imported some Raleighs, but mostly bicycles were still bought and ridden by teenagers. The Schwinn company would not give up so easily. In Europe, technological advancement in components was booming. Schwinn put out the World Traveller, a touring bike with a Sturmey-Archer (British) 3 speed hub, lights, rack, the works!

And, because racing was popular in Europe and Japan, the Paramount racing bicycle. This bicycle came as a single speed or a 3 speed internal hub, but derailleurs were about to make their mark from across both the Atlantic and the Pacific...

That's once good lookin' bike!
The automobile industry and rocket craze of the time influenced aesthetic of bicycles.

The Schwinn Panther melded the curves of the 1950's idyllic rocket and the contours of the Bel Air.
Hardware:
The influence of car and rocket design did not go unnoticed by the hardware designers of the time.
Known at the "Mid-Century Modern" ear, this was an era of satin bronze. An era where chrome left the bathroom and made it to the kitchen, and beyond! Some of the more established companies, such as Corbin and Sargent, were struggling with the changes of style of the time. Weiser invented Kwikset which quickly became the industry standard. Easy to key, easy to install, and cheap to produce, the other companies couldn't keep up. Other companies to dominate the 50's were Hollymade and National which still produce today.
The Deco Style of the 30's was present at the beginning of the decade, and progressed to a more chunky application of chrome, bronze, and the Deco lines. The example shown below highlights the straight lines and hard angles common in an Art Deco Kitchen Set while below we see a shift to the more rounded lines and mis-matches finishes more common in the late 1950's.


Times were a-changin'!
1960's and 1970's
Bicycles:
The 1960's and 1970's were the greatest bicycle boom in America. Bicycle sales shot up as the 10 speed became all the rage. Our friend Thorton's skip tooth chain and single speed was a thing of the past. We now had 10 gears, modern derailleurs, and a 3/16" chain. Bicycling for recreation, family past times, and competitive racing finally caught up the trends in Europe, popularity of European frames and components.
Simplex was the leading producer of low end derailleurs, and Campagnolo the leader in high end parts, as they still are today. Shimano was producing quality parts as well, and grew to lead the industry in engineering and technology.


Schwinn was given a run for their money as bikes were shipped from Europe. Brands such as Bianchi, Puegot, Raleigh, and Motobecane became regular household names. The demand of the bicycle lead manufacturers to produce on a larger scale. Competition for top designs continued to push the industry to higher standards. The 1960's and 70's were the era of mass production.


Hardware:
Companies were growing, the economy was booming, factories were multiplying, and production was cheap. Weiser continued to be a top producer of hardware, and Westlock also came into popularity. Parts were smaller, and cheaper than ever before, so the cost of servicing parts quickly out weighed the cost. Disposable hardware became the norm and continued. The 1960's and 70's focused on engineering finishes, and continuing to come up with cheap parts for changing aesthetics.


I hope this was a fun and informative jaunt through early ages of hardware, bicycle and production. It was certainly educational for me! What do you think, dear readers? Would you rather have a bicycle of yesteryear or are you in love will all the new technology?
How old is your glass doorknob? Read on, my friends!
We see a lot of glass door knobs here at the Hippo Hardware. Not only in terms of style, but age as well. Glass doorknobs were produced widely for over 50 years! Although the glass part of the knob is the flash and style, a big trick to dating them is in the metal base. The subtle design choices can tell you the difference between a 1900 door knob and a 1940's doorknob. These can then tell you are sorts of useful things like "Are these original to my house?" or "are these knobs are from the same set?".
Below is a brief walk through by era:
1890's - The Originals
These were super rare and cutting edge at the time. We like to throw around the term 'mansion-ware' here for stuff like this - only owned by the very wealthy of the time (thus not a lot made). Some glass hardware already existed, notably cabinet knobs, but nothing in the way of door knobs. These knobs feature a very wide base with steps up to the glass. The knobs are frequently if not exclusively pinned (not like your girl in the 1950's but like a brass nail running through the base to attach the knob to the spindle). This has the plus side of being very secure and the downside of being very hard to remove. These knobs are most easily distinguished by their base. The glass came in hexagonal, round, and even some more unusual shapes such as egg shaped or faceted spheres.

Octagonal glass doorknob with wide, stepped base. Pin secures knob to the spindle.
1900's - The Up and Coming
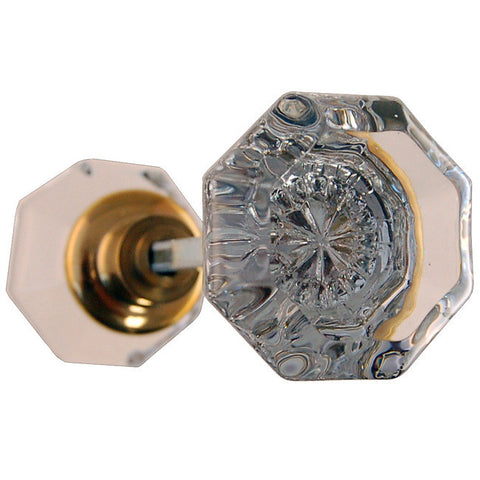
Here we see glass knobs become a little more mainstream but still not much outside of the upper class. This era, again not widely produced, features the more narrow (and familiar) base like but maintains the straight shaft (meaning not threaded, as will become very common later). An easy way to note these knobs is the narrow base without threads (requiring a user to screw directly into the spindle instead of threading a screw through the base). These door knobs also came in a wide variety of glass shapes, although what we see most often are octagonal, shown here.

Octagonal glass slip on door knob
1910's - Breaking into the Mainstream
The first twist-on door knob came out right about 1915, give or take a few years. The twist on style revolutionized all door knobs at the time, glass and otherwise. Instead of needing lots of tiny washers to get your knobs the correct width apart for your door, you could just screw down your knob and tighten the set screw - Voila! Modern magic. These first glass twist-on door knobs feature the same heavy cast brass bases, but instead of a smooth square, are round and threaded inside. See below for a great example: a twist on glass egg doorknob, a fantastic carved glass octagonal doorknob, and a very unusual hollow glass knob filled with mercury. Some additional clues here are the convex style (rounded top instead of a cut face) tend to be from this era.
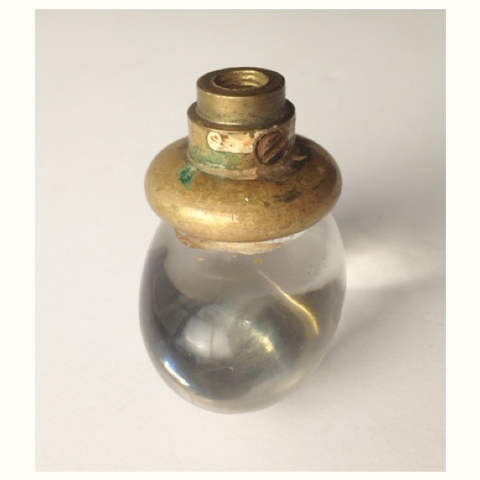

Carved octagonal glass knob

Mercury glass doorknob with a twist-on base
1920's - Everybody Loves Me
It was really the 1920's that saw glass door knobs in a huge percentage of homes. They became affordable and accessible and boy did those homeowners love 'em. Here we see the twist on style base with the with the heavy cast brass but the glass is generally a more standardized shape - octagonal with a cut face or fluted.
Although they weren't common, Schlage patented and produced the first integrated knobset in the mid-1920's. These were new technology at the time and took another 30 years to really catch on.
At hippo, this is generally the beginning of where our stock goes from the specialty case to the beautifully mounded bins. A lot of the really great novelty colors (green, amber, blue), such as these great black glass knobs, were produced in this era.
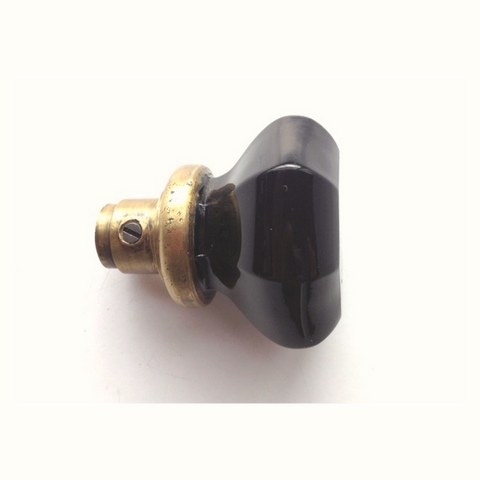
1920's black glass octagonal doorknob
1930's - Keep On Keeping On
Glass doorknobs continued to be wildly popular, so much so that we really see the 'budget' versions getting big. Fluted style really overtakes the octagonal in popularity in the 1930's but both are still widely used. Although we don't have an exact date on when they started, something called 'contractor grade' aka 'super cheap' becomes much more common.
Additionally, as they become more wide spread, bases tend to move from cast brass to stamped brass over iron (like these guys - a fluted glass doorknob with a stamped brass base) or sometimes even stamped steel over iron. Additionally, this is really when we see all those unusual, creative glass shapes all but disappear. There were still outliers, but they become rare. Glass knobs had become more common in less affluent homes although were generally a step up from the plain steel knobs generally seen in working class homes of the time.

1940's - The Wave Has Crested
We finally start to see a small decline in glass knobs - octagonal fading much more quickly than fluted. Although they're still widely produced, they are beginning to lose their grip. Here we also get to see the beginning of the shift of the type of doorknobs you'd find at a new hardware store - the large drill outs and integrated latch. These knobs were produced in the 1940's through the early 1950's. We also see what we affectionately think of as the 'squashed' glass knob made by Dexter - a slightly squatter version of the fluted and round glass knob.

1950's - Time to Move On
Glass doorknobs were really on their way out by this point, having completed the cycle of rare elite to mass consumption to out of style.
1960s to Now - Reproductions
That certainly doesn't mean glass knobs weren't still made. Now, instead, the focus was on reproductions or restoration. Anything with a pot metal or ZMAC base is certainly in this category (such as these fluted glass knobs). Also a set screw with anything other than a slotted head screw is another dead giveway as a production. There are also higher end reproductions with cast brass bases (such as these octagonal glass reproductions here)

Reproduction fluted glass doorknobs
Reproduction octagonal glass doorknobs
Share any tips or tricks you may have in caring for, restoring, or replacing your glass doorknobs in the comments!
Architectural Salvage DIY Holiday Project Ideas
We love finding new ways to use old objects that aren't in demand anymore for their original purpose. As we launch into the holiday season, here are a few fun ideas on how to decorate and celebrate.
1) Get a Key for Santa
We have a bunch of great old keys. When some inquiring minds want to know exactly how Santa will get into the house, some parents have started leaving a key for Santa (gingerly side-stepping the whole Is-Santa-a-Burgler question). We have lots in our store and even a few online to choose from (like this awesome folding key shown below as well as a 'hippo-picks' large sized skeleton key).

2) Hang a Repurposed Wreath
We have awesomely crafty customers who build beautiful wreaths out of all kinds of things. We've had customers use metal faucet handles, door plates, door knobs, assorted light fixture parts, really you name it. Here's an awesome example we found of a wreath made of old tools! (We have some of those in our basement, btw!)

3) Vintage Windows Turned into Picture Frames
Who doesn't like seeing the beautiful faces of their loved ones all in one place? Antique window picture frames are great for decorations or holiday gifts. Our Architecture department stocks a wide variety of old windows perfect for the task.
 Happy Holidays everyone!
A Few of my Favorite Things - Morgan
This is the first post in a series called "A Few Of My Favorite Things" attempting to instill the magic of the sound of music as an individual Hippo employee waltzes you through their favorite objects in the store right now. These items may or may not be for sale online, but they are all available for purchase.
Morgan: One of my favorite things about working here is all the cool stuff I get to see. Not only do I own an old house, but I genuinely just like all this stuff. My taste skews pre-1940's. Modern's never been much of my bag but I can really get behind some good deco, Nouveau, Eastlake Victorian, and sometimes arts and crafts when it doesn't make me feel like I'm in a dungeon.
So, to begin, I'm really into this set of door hardware.

The knobs are deeply cast and the plates are just as burly with rich nouveau style. The pattern is called "Vendome" - Mm!
Next, a lovely set of three Deco shades. The bright color feels crisp and warm while the very round, squat shape reminds me of fruit.

Summertime makes me think of outside decorating. I love using these old parts and pieces to accent or even trellis my plants. In cases where I'm worried about rust, I've scrubbed them down with WD40, sanded them, and coated them with some good old rustolium.

Then there's this beauty. This soap dish really caught my attention for the curved lines and the really heavy quality cast. The finish is also in amazing shape. I'm a big nickel fan in bathrooms.

Lastly, is this really charming mission pendant fixture. The style is clean while showing off the deep green and opalescent orange glass. The light it throws is perfect for a hallway or exterior space.

That's it for now! What are your favorite salvage finds this summer?
Hippo Hats and T-shirts now online: Sweat out this heatwave in style
It's hot here at Hippo. Real hot. But does that get us down? No sir. What do we do then, to survive the heat? We strike a pose in our amazing t-shirts hats (now available online! Click here for t-shirts and here for hats)
<cue Madonna>.

Available online are our fantastic Hippo hats (available in tan and black) and t-shirt (available in blue, grey, and yellow). We have a wide variety of sizes and if you don't see the size/color combination you need, just give us a call or email. We have them printed in small batches and can almost always accommodate requests.

And for us, we'll be prancing on the sidewalks until it gets too hot and then we may be closing early to get ourselves cooled down.

We hope everyone gets to have a fun 4th tomorrow. We will be out celebrating tomorrow and closed for business. Happy 4th of July and here's to some bright fireworks in the city and some bright stars to those lucky enough to make it out camping.

The Newest Hippo
Our newest staff member volunteered to write a blog post and chose to share what it's like to join the Hippo-verse:
I am the newest addition to Hippo Hardware, and let me be the first to admit, it’s overwhelming! The never-ending inventory of super cool is jaw dropping. I’m caught repeatedly hypnotized in the spinning dazzle of yester-year whatevers too often, to the point of literally needing to keep my head down in order to stay on task. I’ve been a member of the lighting department since the beginning of this year. A series of serendipitous events has me exploiting a more electric side. My background is scattered with fifteen years or so in the home restoration business, and while several avenues have led me to develop artistically, my foundation is firm in the world of “I’ll need to look at it, but I think we can fix it.” Seems there was a little hole in Hippo’s repertoire that was carved just for me.
If you are looking for any fix it for your home, save yourself the headache of wasted time and under experienced staff, come here first. If we don’t have what you need we will know where to point you next, if there is a direction to follow… There are strong men, at the ready, to lift and load any claw foot, light fixture, door, or mantel. There’s a revolving crew of ring master stand-ins, Steve Miller being the one and only original, all at the ready for an on the spot stand up and well thought how to DIY. Every department has a magic of it’s own with the third floor shining spot lights, chandeliers, sconces, floor-table-desk lamps, and sputniks ready to take off in a rainbow show. Come one, come all into the labyrinth of stairs and ramps.
Fixing or Replacing Old Stuff: Where to Start
A Brief Introduction:
Let's start with Plumbing
Now, our Lighting department:
And then there's Architecture:
Last but not least, Hardware:
So in conclusion:
Subscribe
Recent Articles
- Have a broken lamp or chandelier? Hippo can help!
- There's been a rumor that we're closing - We're not!
- Removing Valves and Cartridges
- Time Keeps on Ticking
- Hippo Fixes Leaky Faucets
Tags
- antique (2)
- build (1)
- cartridges (1)
- clocks (1)
- faucet (1)
- fix lamps (1)
- greenhouse (1)
- kitchen (1)
- lamp repair (1)
- lighting (1)
- old (1)
- plumbing (1)
- portland (1)
- reuse (1)
- ul certified (1)
- valves (1)
- vintage (3)
- windows (1)
About Us

Hippo Hardware is an eclectic building salvage store specializing in hardware, lighting, architecture and plumbing from 1860-1960. We offer assorted collectibles, trinkets, whatnots, and whoziwhatsits depending on what we get in. The spirit of Hippo Hardware is to rejoice in the individual, the unique, and the original.
Hippo Hardware was officially established in 1976 after the founders Steven Miller and Stephen Oppenheim decided to turn a life of swashbuckling adventures into a second life of swashbuckling adventures. We live in the local, even for our customers far away. That means you will probably hear a story about burying a Porsche in a state park while you are asking about a faucet or meet Fred the shop dog while you're paying for a light fixture. We strongly support community projects, teachers, artists, adventurers, dreamers, and one-man-bands.
If you're looking for a hard to find hardware pattern or can't find the match to your lamp shade, we'd be happy to tell you if we have it, seen it, or know where you could get it.
To make sure you get what you need, we offer the following services:- Lighting and Lamp Repair - We have a fully UL certified lighting repair shop. We can repair and rewire most vintage or antique fixtures. You may want to call or e-mail if it's newer, but we can sometimes fix those too. Shop prices are $80/hour plus parts.
- Customizing - We do our best to make sure it looks just right. Our lighting shop can customize length, finishes, plating, and configuration. Our plumbing department will coordinate refinishing with local companies. The hardware department is able to darken, refinish, clean, and rebuild. Our services can vary depending on staff so please contact us with your project details.
- Returns - Accepted for any reason within 2 weeks of purchase. That means if it doesn't fit, if your sweetheart doesn't like it, if it doesn't match your paint scheme. Receipt required. Returned to you the way you paid and items MUST be in original packaging and condition. Defective or damaged items will not be eligible for a refund.
- If your items were shipped: Shipping refunded only in the case of defective items. Hippo does not refund original OR return shipping cost.
- Online shopping - Conveniently browse our online section of items! Please note: our online section is much smaller than our store selection, we do offer returns for online purchases but do not refund original shipping or provide return shipping. We ship on Wednesdays, Thursdays and Fridays.
- Trade in - Bring in what you have and we will offer you in store credit or cash. Email pictures first if you'd like to talk about it before you get here.
- Mortise lock repair - Hippo is the only hardware store in Portland that offers full mortise lock repair--including French Door mortises and closet mortises! Our repair shop can diagnose and repair your mortise lock or perhaps we have a replacement if a repair is not an option. Shop prices are $80/hour. Please call our store and ask for Colin to speak about your repair!
Hippo Hardware has three glorious floors and 30,000 sq feet of building salvage to explore. Our inventory, and staff, is divided into four departments: Hardware, Lighting, Plumbing, and Architecture. We do our best to highlight our inventory full of unique items and reproductions on our website, but most of our stock is not online yet. Please contact us if you're looking for something you don't see here.
We donate to: NARAL, Planned Parenthood, Portland Women's Crisis Line, Benson High School, Sunnyside Environmental School, Junk to Funk Recycled Fashion Show, SE Works, Vision Northwest, Multnomah Playschool, Union Gospel Mission, Community House, The Friendly House, Marylhurst Childhood Center, Portland Lions Club, Sabin Elementary School, Oya No Kai supporting the Japanese Magnet Program, Lee Owen Stone Preschool, Public Interest Law Project, Jefferson High School for the Performing Arts Theater Department, imago Theater, Reynolds High School, David Douglas High School, and Milagro Theater.


